I've recently completed the wiring of a Luxos headlight and taillight on my Bridgestone RB-T. Because this is the most extensive and fastidious wiring I've done on a bicycle yet, I figured it would be worthwhile to share my experiences.

I'm using a Schmidt SON hub mated to a Mavic A319.  I've got Schwalbe Marathon Supreme 700x35c tires F&R. I'm using VO Zeppelin aluminum fenders. 

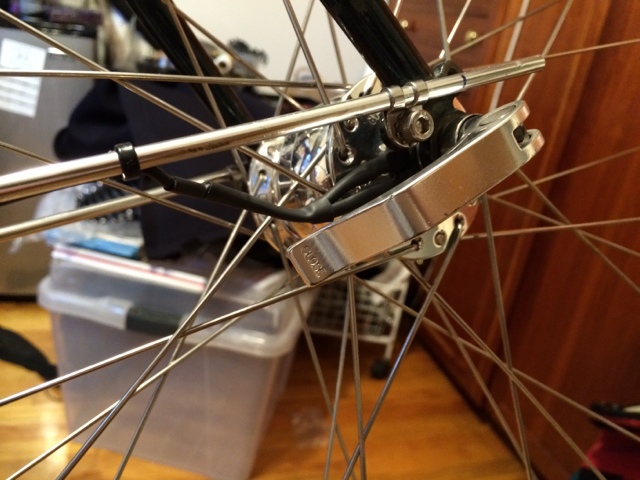
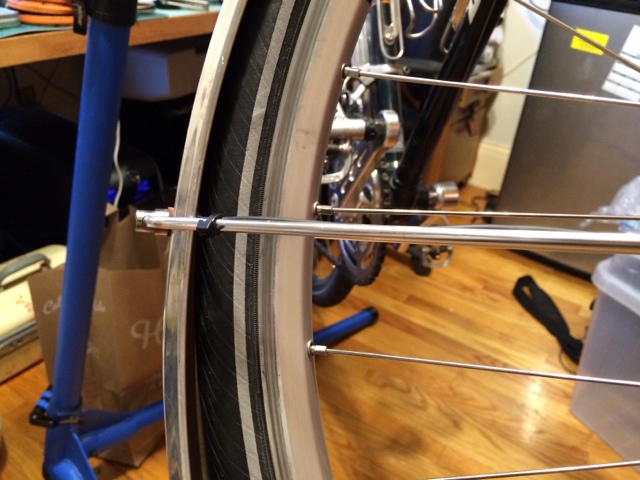
I ran the wire from the hub to the fender along the right fender stay, using zip-ties to keep the wire in place. 

This is also a really clean route for the wire, as it is barely visible. 

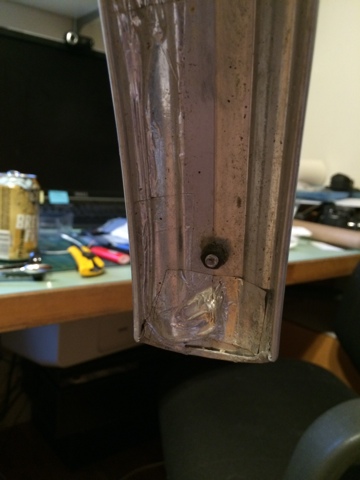
Because I have enough extra room between the fender and the tire, I chose to run the wire on the underside of the fender. Elton at Harris Cyclery told me about a method he learned from Somervillian, whereby you use HVAC duct tape (the REAL stuff, made from aluminum with adhesive on one side). 


The adhesive sticks like crazy, and if you are using silver fenders, the tape completely blends in with the metal.  Also, because this tape is meant to take high heat, it should last a long time. 


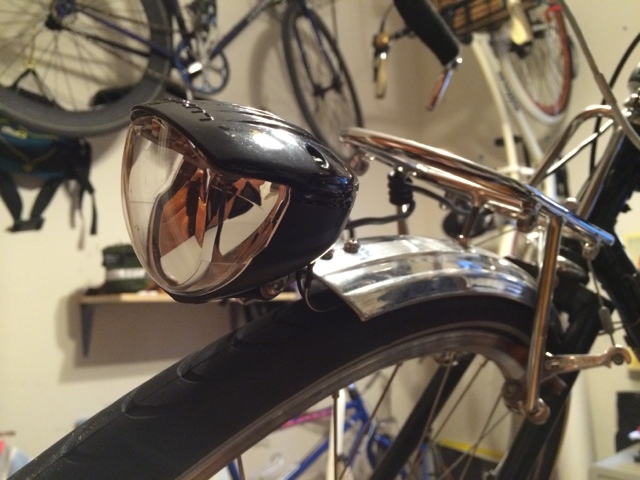
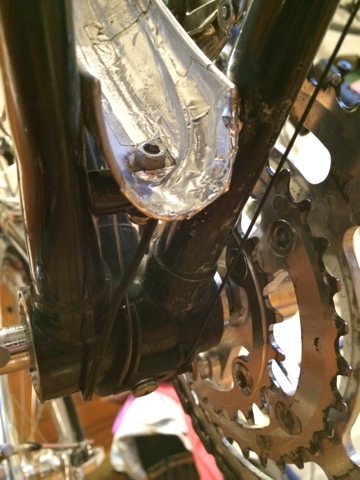
In the front, I used a rubber grommet to bring the wire up through the fender beneath the fork crown to connect back to the taillight wire. 


I then ran the wire along the downtube, using zip-ties to hold the wire.  I then ran the wire beneath the bottom bracket and through the hole in the rear fender. 


I then ran the wire up the inside of the rear fender to the taillight, at which point I drilled a hole for the wires to exit and connect to the light. 


Because I'm using a Luxos U, there is a third wire to worry about: that which connects to the cache battery and the associated USB port for charging my phone while riding. I have not found a very elegant solution for this, so I run the wire from the headlight, wrap it around the VO rando rack and then up to the stem where I've mounted the switch/hub. 


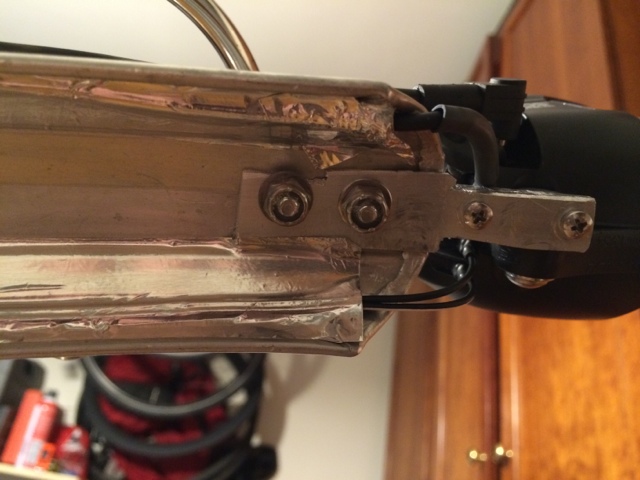
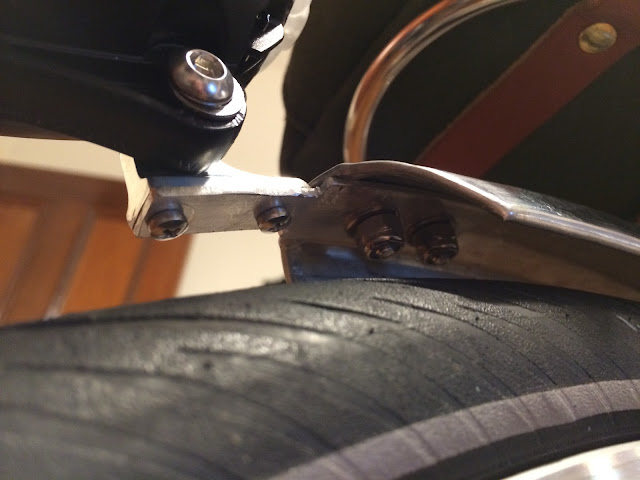
Lastly, because I've recently purchased a Rivendell Trunksack (small) for my rando rack, I needed to be able to mount the front light in a place other than at the fork crown. Harris recently started carrying the M.A.P. Cycles front light fender mount. This was exactly what I needed, BUT the Luxos Is really deep, so it interfered with the rando rack when mounted at the very front of the fender. I took some aluminum bar stock and made an extension off the front of the fender into which I was able to screw the light mount. EDIT:{The aluminum bar stock wound up failing due to metal fatigue from bouncing up and down after only a few rides. Fortunately the light did not roll of a mountain when the piece broke, but I certainly learned my lesson. It has since been replaced with an extra steel rack strut that I had.  I cut it to length and put it in the same place on the underside of the fender. The light mount attaches to that in the same manner. It's been rock solid ever since.}


I had been on the lookout for a good deal on a tandem when about 1 year ago I spied an old (late '80's-early 90's as far as I can tell) Nashbar Tandem 9000 on Craigslist.  If I recall correctly, the person was asking $150-$200 for it. This was already a good deal, as it seems impossible to find someone that believes their shitty tandem is worth anything less than $1000, regardless of condition.  Perhaps because it was listed on CL, I felt compelled to see if they would take less. I offered $100, and told the person that I would need for them to deliver it, as I had no way to pick up a bike that I couldn't ride home (the tires were rotted) and while I had three bike racks on the roof of my car none were capable of carrying a tandem (not to mention the person lived far from the city and I didn't feel like schlepping).  Amazingly my offer was accepted, and two young guys showed up at my apartment the next evening with the following:


The big blue Nashbar 9000 tandem that was dropped off was in relatively decent structural shape, but as I got deeper into the restoration I realized that -shocker- this was a bike that had actually been ridden by its owners, and quite a lot it seemed.

My first attempt at making this land ship roadworthy was geared towards doing it on the cheap, and so I replaced as little as was necessary:
  • I re-cabled and re-housed the drum brake, both rim brakes and both derailers
  • I replaced the tubes and rotted tires with Schwalbe Marathon 27 x 1 1/4" rubber (the best 27" tires that I could identify)
  • I bought matching honey brown Brooks saddles used on eBay. A B17 for the captain and a Flyer for the rear admiral
  • I bought a cheapo seatpost for the rear admiral, as there was none when I got the bike
  • I put new Cinelli cork handlebar tape on both sets of handlebars
  • I replaced the brake pads on the cantilevers with salmon Kool Stop pads
  • I put on rear and front racks that I had lying around
After these modifications and additions, the bike looked like this:

At that point, my wife controlled the drag brake through an aero lever that was mounted to her bars. The other rear lever served as a dummy lever and comfortable place to put her hands.

That was when I got ambitious and decided that we were ready to go cycle touring to and in Acadia National Park.

I borrowed a Burley child trailer from a friend and we hoped to hop the Amtrak Downeaster to the end of the line, at which point we planned on cycling the roughly 150 miles to the park and then exploring the carriage roads on 2 wheels.  That crazy setup looked like this:


When I was loading the bike onto the train at South Station in downtown Boston, the conductor mentioned that he didn't think that tandems were allowed in the bike car. I had planned an entire week-long vacation around being able to bring the bike on the train, and had never seen anything mentioning this fact on the Amtrak website, so I argued vociferously that it would be fine and that he was wrong.  "Lucky" for me, I won the argument and slid the bike into a diagonally oriented rack that simply held the front wheel.  At first I said that due to the length of the steed I wanted to just lay the bike on its side, as I didn't trust the rack, but the conductor wasn't having it.  At that point I felt lucky to get the bike on there, so I didn't argue.

When the train pulled into the final destination, the conductor approached me to inform me (in a very deferential and apologetic manner) that something bad had happened to my bike on the ride.  I walked back to the bike car to find the front wheel completely taco'd. Apparently the bike had tipped during transit and the front wheel stayed in place, thus the Mexican fiesta in the front.

I think I felt as bad as the conductor. He gave me the phone number of a supervisor to call (the following Monday, it was Saturday at this point) who would take care of reimbursing me for the damage.  Owing to my obstinacy, I felt partially responsible.  Furthermore, I'm a huge believer in rail travel, and I didn't want to do something that I felt would further damage the already enfeebled finances of Amtrak.  If I had felt entirely guiltless, I would not have taken this approach, but I accepted the responsibility that I thought I deserved. My wife was not as understanding (this was our one-and-only one week summer vacation that had potentially been ruined after all).

There was a bike shop very close to the train station, but they did not stock 48-hole 27" rims (imagine!). I was weary of what they had in stock supporting our heavy load.

This is what the bike (and my trooper of a wife) looked like once we got off the train:


I decided that the only way to salvage the vacation was to take the train back to Boston with the tandem, go home, drop off the tandem and put two "regular" bikes on the roof of the car and drive back up.  Thus my dreams of a car-free vacation were dashed, but the vacation was salvaged. 

The carriage roads of Acadia provide for miles of stress-free riding, and we subsequently had a terrific vacation on 4 wheels instead of two:

Can't do that with a tandem
Fast-forward to this past winter.
It's been a long, cold winter in Boston, so anything that can occupy a few hours of indoor time is always in demand. Fortunately I am happy to come home from work and spend an hour or two working on bike projects before dinner (and my wife is kind enough to oblige this indulgence).

So here begins what you've probably come to this post for: the dirty details of what I did to the bike to turn it into one that I could really be excited about.

First thing's first: a 27"-700c conversion was necessary. The tire selection for 27" rubber stinks, and I wanted something much juicier than what I could find in imperial dimensions. I've mentioned before my affinity for Schwalbe Marathon Supreme's, and the tandem was the perfect opportunity to put them on in their fattest form: 45c. I don't think it would have been a problem had the bike originally been designed for 700c wheels, but the small decrease from 27"->700c probably made this a tad easier.


Of course I needed new wheels to match the rubber, so I used this as an opportunity to use my 32-hole Ultegra hub mated to a Mavic A319 rim that was on my Bridgestone RB-T (replacing that with a SON28 on the BStone). I reused the rear hub from the tandem (a sealed bearing 48-hole Sansin designed for the already present Arai drum brake) and asked Elton at Harris Cyclery to build me a new wheel mated to a NMSW Velocity Atlas. Every other reference to "bombproof" wheels in the history of the internet should point to the below pictures:


When Velo Orange announced their "Crazy Bars" I immediately decided that I needed two sets of them. I missed out on the first round, but I got in on the second and swapped out both front and rear drops for these very practical (and admittedly bizarre) h'bars.


Only problem was that the OEM quill didn't work with bars like these, so I needed to convert to a threadless-type stem. I originally assumed that the stem was a standard 1" quill, but I was mistaken. This steed takes a somewhat unique 1-1/8" quill. Fortunately, Universal Cycles had a 1-1/8" quill to threadless adapter, to which I attached a Profile Design stem:


I also took the Nitto rando rack that was previously on my commuter and put it on this bike. All I had to do was buy some fork blade clamps (from Bikes Not Bombs).

Clamps not actually visible in this picture, but they are elsewhere. That's a Rivendell Trunksack.
One of the things that attracted me to the Crazy Bars was the ability to brake from multiple positions.  Much easier said than done.  The bars have a thickness of 22.2mm at the main part and 23.8 in the horns. Therefore, inverse levers won't fit into the upright portion, nor will bar end shifters.  Personally I think this is a poor choice on VO's part, but I'm sure they have their reasons.  That being said, I had to figure out a solution that would allow me to have two sets of levers with bar end shifters and yet leave the horizontal portion of the bar clean, as I never use that area, other than to house devices like my iPhone mount.  After much researching, I settled on the JTek AeroBrake, which attaches to Shimano barcons by replacing the bolt with part of the brake mechanism:


In the upright portion, I went with JTek AeroBrake Clamp-on Style levers, as most typical inverse levers require a larger diameter than the roughly 17.6mm that is present on the VO Crazy Bars. Plus, I figured I might as well keep all the brake levers in the same family and I'm always interested in supporting small-scale American bicycle parts manufacturers:


I subsequently got somewhat Bob-ish and finished the cork bar tape with nylon string (not hemp or cotton...)

 
Four brake levers and only two brakes (not including the Arai drag/drum brake which we'll get to later). I originally ordered a DoubleControl Model L from JTek engineering as well, but once I received it I decided that I would like to have the integrated spring that is present in the Problem Solvers version of the same device.  I also was not very happy with what appeared to be pretty rough tolerances in the JTek version.

This image is from JTek's website. You can see their DoubleControl just below where the stem would connect.
I contacted Ryan at JTek and he gladly accepted my return of the DoubleControls and I ordered two Problem Solvers Cable Doublers (in the 2:1 guise that pulls one brake with either of two levers, they also sell a 1:2 variety that allows one lever to pull two brakes).  I was very pleased with the quality of these devices, and they have two integral springs that prevents the lever that is not being squeezed from going limp when the other one is pulled.  Only thing: they are a supreme pain in the ass to get set up correctly, especially on a tandem where the cable runs are a mile long.  I located both of the doublers at the handlebars, so that I would only have to run one cable to the brakes (not as big of a deal for the front, but it certainly was for the rear).  It took me three post-work evenings of cursing at these buggers before I got them dialed in.


So far it doesn't appear that I need to cinch the doublers to the bars to prevent rattling, but if I do I'll have to figure out something more elgegant than zip-ties, probably twine and do a similar treatment to the ends of the h'bars.


Because I'm new to the whole world of tandems, I spent an inordinate amount of time researching "how it should be done".  Sheldon Brown mentions controlling the rear drag/drum brake with a bar end shifter. This allows you to set it and forget it if you are descending a very large hill.  I really liked the simplicity of this solution, and I had already experienced my wife braking when I was not expecting it when she had control over this.  Being the control freak that I am, I determined that I would control all decelerating devices.  Because I didn't want to clutter the handlebars, and because I thought it would be neato, I ordered a Paul Thumbie in 26.0 mm guise. I also bought a used set of Shimano barcons on eBay.  Because I needed three shifters, I used the two that I had on my RB-T (and replaced them there with Riv's silky-smooth variety).  While it's probably overkill to use a Thumbie in this situation, I think it's pretty slick, and it tucks nicely out of the way.

The brake is engaged in this picture. Using a barcon allows you to have a parking brake, which is very handy with an unwieldy steed like a tandem.

The Ritchey Break-Away Quick Disconnect (DERAILER VERSION) is just to the left of the lever arm.
I decided to install a Ritchey Break-Away Quick Disconnect, because removing the rear wheel was such an awful pain, and the cable was getting really chewed up at the lever arm on the Arai drum.  I used the derailer version because I'm actually using derailer cable connected to a shifter (rather than brake cable connected to a brake lever).  Very little force is required to actuate the drum, so I'm not very concerned about the loss of 0.1mm of cable thickness vs. a brake cable. I am however using brake cable housing, which seems like a no-brainer after it was pointed out to me by someone on the iBob list.

I replaced the cantilever brakes with Tektro mini-V's, and I pull Kool Stop pads on them (natch).  I also ordered Jagwire adjustable noodles as all of the reviews I read of the brakes said they were a worthy addition (and cheap one at that at ~$4 each).  The canti's were interfering with my racks, and I read that people liked them, so I figured why not.  So far they've been great and they give me plenty of flexibility in pad placement despite the 27"->700c conversion.

I no longer need the cable hanger that is attached to the seatpost bolt, but I haven't removed it yet.


Other details that are not particularly photo-worthy:

  • Both bottom brackets were replaced with modern, sealed bearing variety. (I actually can't remember what I put in there, but I think they are VO).
  • I replaced the freewheel with a modern Shimano 7-speed
  • The primary chain was replaced with a SRAM something-or-other
  • Al housing and cables were replaced
  • The original Suntour barcons were replaced with Shimano friction shifters. I've since learned that the Suntour barcons are relatively desirable. I don't know why, as I found them to be inferior to Shimano. I sold them on eBay. I also removed the Suntour cantilever brakes, as they no longer reached after the 700c conversion.  I'm going to sell them, I just haven't yet.
  • I put on four generic silver aluminum bottle cages
  • the pedals are constantly changing
  • the original Suntour F&R derailers remain for the time being, as do the triple chainrings.


I would be remiss if I did not thank the wonderfully helpfull people on the Internet Bridgestone Owner's Bunch (iBob) list.  It's the perfect place to get advice on a project like this.


We're ready for rando season!

Hope to see you at some NER events this spring, and hopefully at PBP 2015...


I had been on the lookout for a good deal on a tandem when about 1 year ago I spied an old (late '80's-early 90's as far as I can tell) Nashbar Tandem 9000 on Craigslist.  If I recall correctly, the person was asking $150-$200 for it. This was already a good deal, as it seems impossible to find someone that believes their shitty tandem is worth anything less than $1000, regardless of condition.  Perhaps because it was listed on CL, I felt compelled to see if they would take less. I offered $100, and told the person that I would need for them to deliver it, as I had no way to pick up a bike that I couldn't ride home (the tires were rotted) and while I had three bike racks on the roof of my car none were capable of carrying a tandem (not to mention the person lived far from the city and I didn't feel like schlepping).  Amazingly my offer was accepted, and two young guys showed up at my apartment the next evening with the following:


The big blue Nashbar 9000 tandem that was dropped off was in relatively decent structural shape, but as I got deeper into the restoration I realized that -shocker- this was a bike that had actually been ridden by its owners, and quite a lot it seemed.

My first attempt at making this land ship roadworthy was geared towards doing it on the cheap, and so I replaced as little as was necessary:
  • I re-cabled and re-housed the drum brake, both rim brakes and both derailers
  • I replaced the tubes and rotted tires with Schwalbe Marathon 27 x 1 1/4" rubber (the best 27" tires that I could identify)
  • I bought matching honey brown Brooks saddles used on eBay. A B17 for the captain and a Flyer for the rear admiral
  • I bought a cheapo seatpost for the rear admiral, as there was none when I got the bike
  • I put new Cinelli cork handlebar tape on both sets of handlebars
  • I replaced the brake pads on the cantilevers with salmon Kool Stop pads
  • I put on rear and front racks that I had lying around
After these modifications and additions, the bike looked like this:

At that point, my wife controlled the drag brake through an aero lever that was mounted to her bars. The other rear lever served as a dummy lever and comfortable place to put her hands.

That was when I got ambitious and decided that we were ready to go cycle touring to and in Acadia National Park.

I borrowed a Burley child trailer from a friend and we hoped to hop the Amtrak Downeaster to the end of the line, at which point we planned on cycling the roughly 150 miles to the park and then exploring the carriage roads on 2 wheels.  That crazy setup looked like this:


When I was loading the bike onto the train at South Station in downtown Boston, the conductor mentioned that he didn't think that tandems were allowed in the bike car. I had planned an entire week-long vacation around being able to bring the bike on the train, and had never seen anything mentioning this fact on the Amtrak website, so I argued vociferously that it would be fine and that he was wrong.  "Lucky" for me, I won the argument and slid the bike into a diagonally oriented rack that simply held the front wheel.  At first I said that due to the length of the steed I wanted to just lay the bike on its side, as I didn't trust the rack, but the conductor wasn't having it.  At that point I felt lucky to get the bike on there, so I didn't argue.

When the train pulled into the final destination, the conductor approached me to inform me (in a very deferential and apologetic manner) that something bad had happened to my bike on the ride.  I walked back to the bike car to find the front wheel completely taco'd. Apparently the bike had tipped during transit and the front wheel stayed in place, thus the Mexican fiesta in the front.

I think I felt as bad as the conductor. He gave me the phone number of a supervisor to call (the following Monday, it was Saturday at this point) who would take care of reimbursing me for the damage.  Owing to my obstinacy, I felt partially responsible.  Furthermore, I'm a huge believer in rail travel, and I didn't want to do something that I felt would further damage the already enfeebled finances of Amtrak.  If I had felt entirely guiltless, I would not have taken this approach, but I accepted the responsibility that I thought I deserved. My wife was not as understanding (this was our one-and-only one week summer vacation that had potentially been ruined after all).

There was a bike shop very close to the train station, but they did not stock 48-hole 27" rims (imagine!). I was weary of what they had in stock supporting our heavy load.

This is what the bike (and my trooper of a wife) looked like once we got off the train:


I decided that the only way to salvage the vacation was to take the train back to Boston with the tandem, go home, drop off the tandem and put two "regular" bikes on the roof of the car and drive back up.  Thus my dreams of a car-free vacation were dashed, but the vacation was salvaged. 

The carriage roads of Acadia provide for miles of stress-free riding, and we subsequently had a terrific vacation on 4 wheels instead of two:

Can't do that with a tandem
Fast-forward to this past winter.
It's been a long, cold winter in Boston, so anything that can occupy a few hours of indoor time is always in demand. Fortunately I am happy to come home from work and spend an hour or two working on bike projects before dinner (and my wife is kind enough to oblige this indulgence).

So here begins what you've probably come to this post for: the dirty details of what I did to the bike to turn it into one that I could really be excited about.

First thing's first: a 27"-700c conversion was necessary. The tire selection for 27" rubber stinks, and I wanted something much juicier than what I could find in imperial dimensions. I've mentioned before my affinity for Schwalbe Marathon Supreme's, and the tandem was the perfect opportunity to put them on in their fattest form: 45c. I don't think it would have been a problem had the bike originally been designed for 700c wheels, but the small decrease from 27"->700c probably made this a tad easier.


Of course I needed new wheels to match the rubber, so I used this as an opportunity to use my 32-hole Ultegra hub mated to a Mavic A319 rim that was on my Bridgestone RB-T (replacing that with a SON28 on the BStone). I reused the rear hub from the tandem (a sealed bearing 48-hole Sansin designed for the already present Arai drum brake) and asked Elton at Harris Cyclery to build me a new wheel mated to a NMSW Velocity Atlas. Every other reference to "bombproof" wheels in the history of the internet should point to the below pictures:


When Velo Orange announced their "Crazy Bars" I immediately decided that I needed two sets of them. I missed out on the first round, but I got in on the second and swapped out both front and rear drops for these very practical (and admittedly bizarre) h'bars.


Only problem was that the OEM quill didn't work with bars like these, so I needed to convert to a threadless-type stem. I originally assumed that the stem was a standard 1" quill, but I was mistaken. This steed takes a somewhat unique 1-1/8" quill. Fortunately, Universal Cycles had a 1-1/8" quill to threadless adapter, to which I attached a Profile Design stem:


I also took the Nitto rando rack that was previously on my commuter and put it on this bike. All I had to do was buy some fork blade clamps (from Bikes Not Bombs).

Clamps not actually visible in this picture, but they are elsewhere. That's a Rivendell Trunksack.
One of the things that attracted me to the Crazy Bars was the ability to brake from multiple positions.  Much easier said than done.  The bars have a thickness of 22.2mm at the main part and 23.8 in the horns. Therefore, inverse levers won't fit into the upright portion, nor will bar end shifters.  Personally I think this is a poor choice on VO's part, but I'm sure they have their reasons.  That being said, I had to figure out a solution that would allow me to have two sets of levers with bar end shifters and yet leave the horizontal portion of the bar clean, as I never use that area, other than to house devices like my iPhone mount.  After much researching, I settled on the JTek AeroBrake, which attaches to Shimano barcons by replacing the bolt with part of the brake mechanism:


In the upright portion, I went with JTek AeroBrake Clamp-on Style levers, as most typical inverse levers require a larger diameter than the roughly 17.6mm that is present on the VO Crazy Bars. Plus, I figured I might as well keep all the brake levers in the same family and I'm always interested in supporting small-scale American bicycle parts manufacturers:


I subsequently got somewhat Bob-ish and finished the cork bar tape with nylon string (not hemp or cotton...)

 
Four brake levers and only two brakes (not including the Arai drag/drum brake which we'll get to later). I originally ordered a DoubleControl Model L from JTek engineering as well, but once I received it I decided that I would like to have the integrated spring that is present in the Problem Solvers version of the same device.  I also was not very happy with what appeared to be pretty rough tolerances in the JTek version.

This image is from JTek's website. You can see their DoubleControl just below where the stem would connect.
I contacted Ryan at JTek and he gladly accepted my return of the DoubleControls and I ordered two Problem Solvers Cable Doublers (in the 2:1 guise that pulls one brake with either of two levers, they also sell a 1:2 variety that allows one lever to pull two brakes).  I was very pleased with the quality of these devices, and they have two integral springs that prevents the lever that is not being squeezed from going limp when the other one is pulled.  Only thing: they are a supreme pain in the ass to get set up correctly, especially on a tandem where the cable runs are a mile long.  I located both of the doublers at the handlebars, so that I would only have to run one cable to the brakes (not as big of a deal for the front, but it certainly was for the rear).  It took me three post-work evenings of cursing at these buggers before I got them dialed in.


So far it doesn't appear that I need to cinch the doublers to the bars to prevent rattling, but if I do I'll have to figure out something more elgegant than zip-ties, probably twine and do a similar treatment to the ends of the h'bars.


Because I'm new to the whole world of tandems, I spent an inordinate amount of time researching "how it should be done".  Sheldon Brown mentions controlling the rear drag/drum brake with a bar end shifter. This allows you to set it and forget it if you are descending a very large hill.  I really liked the simplicity of this solution, and I had already experienced my wife braking when I was not expecting it when she had control over this.  Being the control freak that I am, I determined that I would control all decelerating devices.  Because I didn't want to clutter the handlebars, and because I thought it would be neato, I ordered a Paul Thumbie in 26.0 mm guise. I also bought a used set of Shimano barcons on eBay.  Because I needed three shifters, I used the two that I had on my RB-T (and replaced them there with Riv's silky-smooth variety).  While it's probably overkill to use a Thumbie in this situation, I think it's pretty slick, and it tucks nicely out of the way.

The brake is engaged in this picture. Using a barcon allows you to have a parking brake, which is very handy with an unwieldy steed like a tandem.

The Ritchey Break-Away Quick Disconnect (DERAILER VERSION) is just to the left of the lever arm.
I decided to install a Ritchey Break-Away Quick Disconnect, because removing the rear wheel was such an awful pain, and the cable was getting really chewed up at the lever arm on the Arai drum.  I used the derailer version because I'm actually using derailer cable connected to a shifter (rather than brake cable connected to a brake lever).  Very little force is required to actuate the drum, so I'm not very concerned about the loss of 0.1mm of cable thickness vs. a brake cable. I am however using brake cable housing, which seems like a no-brainer after it was pointed out to me by someone on the iBob list.

I replaced the cantilever brakes with Tektro mini-V's, and I pull Kool Stop pads on them (natch).  I also ordered Jagwire adjustable noodles as all of the reviews I read of the brakes said they were a worthy addition (and cheap one at that at ~$4 each).  The canti's were interfering with my racks, and I read that people liked them, so I figured why not.  So far they've been great and they give me plenty of flexibility in pad placement despite the 27"->700c conversion.

I no longer need the cable hanger that is attached to the seatpost bolt, but I haven't removed it yet.


Other details that are not particularly photo-worthy:

  • Both bottom brackets were replaced with modern, sealed bearing variety. (I actually can't remember what I put in there, but I think they are VO).
  • I replaced the freewheel with a modern Shimano 7-speed
  • The primary chain was replaced with a SRAM something-or-other
  • Al housing and cables were replaced
  • The original Suntour barcons were replaced with Shimano friction shifters. I've since learned that the Suntour barcons are relatively desirable. I don't know why, as I found them to be inferior to Shimano. I sold them on eBay. I also removed the Suntour cantilever brakes, as they no longer reached after the 700c conversion.  I'm going to sell them, I just haven't yet.
  • I put on four generic silver aluminum bottle cages
  • the pedals are constantly changing
  • the original Suntour F&R derailers remain for the time being, as do the triple chainrings.


I would be remiss if I did not thank the wonderfully helpfull people on the Internet Bridgestone Owner's Bunch (iBob) list.  It's the perfect place to get advice on a project like this.


We're ready for rando season!

Hope to see you at some NER events this spring, and hopefully at PBP 2015...


Spring is finally here. For those of us that have been riding through the winter, it is refreshing to begin to feel comfortable leaving (some of) the layers at home.
There is nothing quite like riding through the city, noticing all the birds and flowers that are returning.
So get on your bike this afternoon (Friday March 29) and come to Copley Sq at 5:45pm for a bicycling celebration. 
See you there.
Resurrected 1994 Bridgestone RB-T
In the spring of 1994 my parents bought me a Bridgestone RB-T for a cross-country (Seattle to Portsmouth, NH) ride that I was preparing to do that summer.  The previous summer I had my first experience with extended bicycle touring when I participated in a month-long  700 mile bike tour around the Olympic Peninsula in Washington State.  While that trip was van supported, my cross-country trip was not and therefore the road bike I borrowed from my cousin (a Nishiki, probably 14-speed) would not suffice.  I needed a bike that could be loaded with front and rear panniers and that had proper gearing for crossing the Rockies.  My father and I went to a number of bike shops in the greater Boston area, and we happened upon a bizarre bike shop that neither of us had even been to, and I don't know if I've been there since we purchased the bike: Farina's on Galen Street in Watertown, MA.  I say "bizarre" because not only do they sell bicycles, but they also sell lawnmowers, snowblowers and various other assorted gas-powered yard equipment.  The whole experience was markedly unremarkable in that I don't really recall much about buying the bike.  Little did my father or I know that we were to come home with a bit of a cult icon in the bike world: a Bridgestone RB-T ("T" for touring).  For those that don't know, Bridgestone was then run by Grant Petersen who currently runs Rivendell Bicycle Works, and 1994 was the last year that Bridgestone sold bicycles in America.  Considering that I grew up in Newton, we should have gone to Harris Cyclery, home of Sheldon Brown, but we lived in a different part of the city, and I guess that Harris wasn't really on our radar.  Sheldon has a whole section on his site devoted to Bridgestone, including all of the catalogs up to 1994 when they ceased operations in the US.  Here is the page from the brochure depicting what my bike looked like when I got it.
1994 Bridgestone Catalog Page (from Sheldonbrown.com)
I went off to college in Portland, Oregon and chose to bring my father's old beater Specialized Rock Hopper rather than the RB-T, which stayed in my parents' basement.  I put slicks on the Rock Hopper and it served its purpose as a college bike admirably, although it got ridden much less than one would imagine considering how much I currently ride and that I was living in Portland.
I subsequently moved to Atlanta for grad school and I brought the Rock Hopper rather than the RB-T.  I didn't ride much while I lived there as that city is so car-centric.  Were I to live there now I would ride, but at the time it just wasn't part of my plan.
I moved back to Boston in 2006, settling into life in JP.  I began riding regularly within 6 months-or-so and I retrieved the Bridgestone from the basement and it became my primary ride for a while.  The wheels were screwed up and I bought some Ritchey deep-section wheels with bladed spokes from Nashbar that ultimately looked ridiculous on it.  I then built up a fixed-gear and that became my primary ride during my blossoming bike obsession over the following 5 years.
A Beauty Reborn
The Bridgestone became my winter bike and was a bit neglected.  As I began to appreciate the beauty of this bike, I realized that at some point I would like to do a complete rebuild of the bike.  When I first resurrected the bike when I moved back to Boston I had gone in to International Bike to ask them what they thought it needed.  I was told that it was not worth putting any money into it, that I should just buy a new one.  Needless to say, I didn't take their advice, and I began to see that there are numerous types of bike shops, not all of which have a philosophy about cycling that is one I agree with.  I'll save more on that for another post.
The pictures here are of the completed project.  It is the first bike that I have ever built entirely by myself from the ground up (not including the frame (obviously) and the wheels which I had built for me).  It was an amazingly fun activity, and was all the more rewarding considering that I rode this bike across the country so there is obviously some sentimental attachment.  While this might be heresy for some who think that bikes like this should be restored with period perfect parts: I actually think the bike is more beautiful than it was the day it was new, and any parts that I have added (as opposed to reusing) are certainly superior to the original equipment.
So here is the part-by-part breakdown of my rebuild:
Tange double butted tubing on the RB-T. The paint is in remarkably good condition considering that the bike is almost 20 years old.
I replaced the original triple crankset with a Fluted Triple 24x34x48T from Velo Orange.  This give the bike lower gearing than it originally came with, as the bike previously had a 52T large ring.  The front derailer (Sheldon spelling...) is the original Shimano RX100 clamp-on.  The pedals are Velo Orange City Pedals that I had sitting around, they will probably be swapped for something a little larger or something with SPD compatibility.  I used new VO bottom bracket as well, as the spacing was different for this crankset relative to the original.
The rear derailer is the original Shimano RX100.  The RB-T came as a 7-speed drivetrain, but it is increasingly hard to find decent parts that are 7-speed, and there was really no reason not to go up, so I have changed to an 8-speed SRAM PG-850 11-30T cassette.  Because I am running the original barcon shifter in friction mode, there is no problem making this switch.  The chain is a Wipperman ConneX 808.
Mavic A319 rims are new. Double-butted stainless steel spokes with brass nipples laced to...
Ultegra 32H front hub laced 3X, and...
Ultegra 32H rear hub laced 3X. These wheels were hand-built by www.bicyclewheelwarehouse.com.  I would have preferred to have them built locally, but I saved a ton of money on these and I was already spending too much money as it was.  I still need to cut the fender stays.
American made Paul Components Touring Canti with polished finish up front.  Another serious upgrade from the original brakes.  Front fender is a 52mm Velo Orange Zeppelin.  The headset is original, mainly because it seems like it is in decent shape, I serviced it with the help of Broadway Bicycle School a number of years ago, and I don't have the proper tools to remove it myself.  If this one ever needs replacing, I'll put a Chris King in there.
Paul Components Touring Canti with polished finish in the rear too.  Same VO 52mm Zeppelin fender.  Paul gives you a pair of salmon Kool Stop pads when you buy their brakes.  It's the least they can do considering how expensive they are...
Brooks B17 saddle.  This is much better than the Avocet saddle that the bike came with.  That thing made it hurt to pee!
A little Japanese flair: an NJS stamped Nitto Jaguar SP-72 27.0mm seatpost that I ordered off Ebay from a guy that sells used Kerin gear.  You know you are a bike dork when you get excited about a seatpost, and this one is a beauty.  I have a Jaguar on my Iglehart (in 27.2mm guise) too and it is much more appropriate for this bike than a Thompson IMHO.  The original seatpost was an ugly cheapo giveaway.  All parts that I did not reuse that were still functional were given to Bikes Not Bombs.  The brake cable hanger is original.  The kitty sticker is not.
I'm pretty proud of this piece of improvisational bicycle mechanics, and I really hope that this was my idea and that I didn't see it somewhere a long time ago, filing it away for a time when I would need it, because I think it is slick as hell:  the rear fender is mounted to the brake bridge using an old threaded presta tube valve as the connector between the frame and the "L" bracket.  The VO fenders come with 2 brackets for the rear fender, one that wraps around the fender, and one that requires you to drill into the fender and then screw the "L" bracket into the fender from beneath.  I originally used the former, but it looks ugly, and I had tire clearance issues with it.
I used 3 of the screws that typically go on a presta valve and some of the extra leather washers I had.  This is rock solid so far, and looks pretty killer if you ask me.
Nitto Pearl 110mm 1" threaded quill stem.  I considered going for a matching Jaguar, but the slope of the Jaguar stem is really severe and considerably more expensive.  The Pearl is still a gorgeous stem with that sheen that Nitto is known for.  For some reason the RB-T originally came with a black stem.  I have no idea what the aesthetic thinking was for that, because it looked awful from day one.  This is a major aesthetic upgrade.  Original Shimano barcon bar end shifters set to friction mode to accommodate the 8-speed drivetrain (and because that's how Grant says you should use them).
In true Grant Peterson fashion, I used moustache-style bars and finished the bar tape with waxed thread.  I had an extra pair of Soma Oxford bars, so these are not the Nitto Moustache that Grant designed, but they are close.  I have them turned down.  The brake levers are the original Shimano SLR Exage.  Bar tape is a retro perforated felt-like variety.  You can see that I had to use a Nitto stainless stem shim in there to change from the 26.0mm stem to the 25.4mm bar clamp area.  This was the result of a mislabeled Ebay purchase that I was none to happy about.  I wound up scratching the handlebars pretty good trying to get that thing in there. Oh well.  The front brake cable hanger is original.
Schwalbe Marathon Supreme 700x35c.  It turns out that these are really like a 37c, and that therefore the 45mm fenders that I originally purchased would not fit as there was tire rub.  From everything I've read about these tires they are great. I think I've officially been converted from a Conti man to a Schwalbe man.  All my bikes have them now, including the Marathon Winter studs which are great btw.
From the front
From the back
I couldn't be more pleased! See you on the road.

The Blizzard is a Boon for Cyclists

Gov. Patrick has banned all vehicular traffic after 4pm in THE WHOLE STATE! Woo hoo.  Throw those Marathon Winter studded tires on your steed (if you have not already done so) and get out there and ride.  My commute this morning to work was a breeze and I’m pumped for the ride home.

March 2024
M T W T F S S
 123
45678910
11121314151617
18192021222324
25262728293031